- Published on
Hopefully simple WebAssembly starting guide
- Authors
- Name
- Carlos Baraza
- @carlosbaraza
- Bio
- I write software and other philosophical stuff.


Today we’d be writing our first WebAssembly module to solve the widely known Conway’s Game of Life.
This article is part of a workshop we run at the WebAssembly London Meetup.
This guide is aimed towards web developers, who are already familiarised with the JavaScript ecosystem: NPM, Node, TypeScript, browsers. However, I hope to make it simple and fun for everybody to learn some AssemblyScript (TypeScript to WebAssembly compiler).

What is WebAssembly?
In a nutshell, WebAssembly is a compile target for the web. It is a very simple low-level language that can run in the browser. For example, you could compile C code to WebAssembly and run a C program in the browser. Awesome, right!?
Why WebAssembly?
Web applications are increasingly complex and a better compile target than JavaScript was due for quite some time. We all want to deliver highly optimized web applications like games, complex UIs, etc.
It is possible to write memory and computationally optimized Software using WebAssembly. If your web application has a critical CPU-intensive task, it is very likely that WebAssembly could help you deliver a better experience than JavaScript.
Getting started… Now!
In order to grasp the feeling of building a WebAssembly module, I recommend starting with a simple online IDE. During this guide, we will use WebAssembly.Studio.
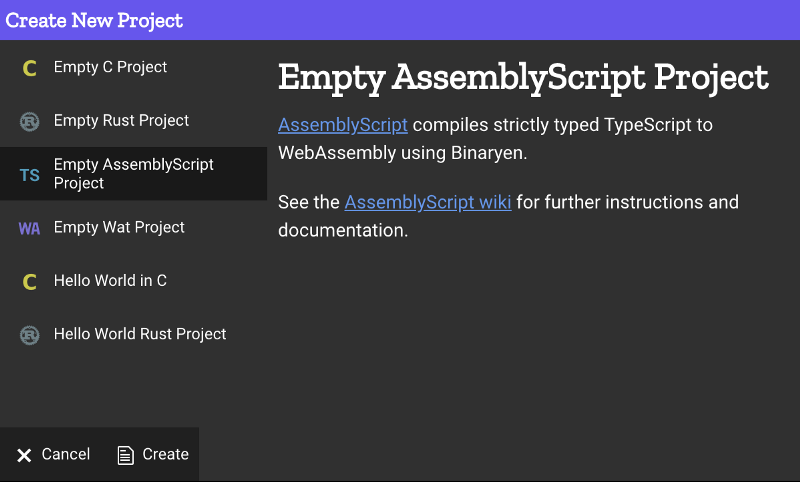
Open the https://webassembly.studio page and create a new TypeScript project.

Building your first module
Now that you have a project, simply click “Build and Run” and contemplate the beauty of your WebAssembly browser VM calculating the Answer to the Ultimate Question of Life, the Universe, and Everything.
At the bottom right corner, you will see the answer printed on the screen, for you… and just for you...

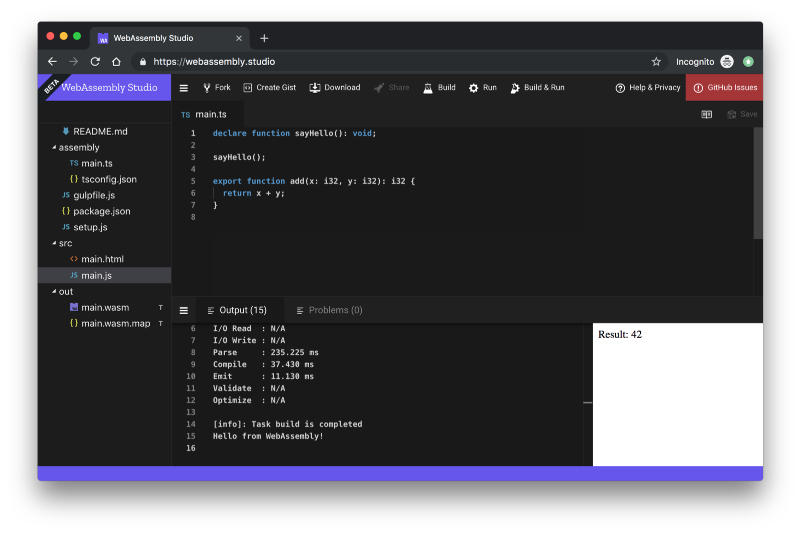
Voila! You compiled your first WebAssembly module.
Conway’s Game of Life
Now, we are going to step up and build a more complex piece of Software. It is based upon an official example.
I will guide you along the way explaining what is what, although bear in mind that all the tools used in this tutorial are kind of experimental yet. Therefore, you could encounter some issues along the way.
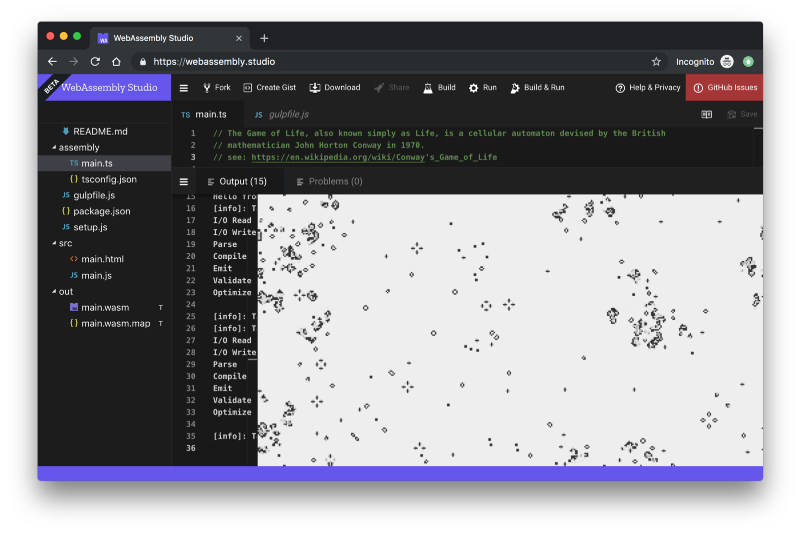
Demo of the Conway’s Game of Life we are building
The HTML
Firstly, we need to set up the index.html file adding a canvas tag and very simple styles, so the canvas takes the entire page width and height.
<!DOCTYPE html>
<html>
  <head>
    <meta charset="utf-8" />
    <style>
      html,
      body {
        height: 100%;
        margin: 0;
        overflow: hidden;
      }
      canvas {
        width: 100%;
        height: 100%;
      }
    </style>
  </head>
  <body style="background: #fff">
    <canvas id="canvas"></canvas>
    <script src="./main.js"></script>
  </body>
</html>
The JavaScript glue code
The WebAssembly module is not something we can run directly from the HTML like JavaScript (using <script>). We need to instantiate the module using JavaScript:
- Let the module know how much memory we’d like to allocate for it.
- Map the input/outputs.
- Orchestrate the module execution.
Therefore, JavaScript is the master and should have the logic to use the module.
// Set up the canvas with a 2D rendering context
const canvas = document.getElementById("canvas");
const context = canvas.getContext("2d");
const boundingClientRect = canvas.getBoundingClientRect();
canvas.width = boundingClientRect.width | 0;
canvas.height = boundingClientRect.height | 0;

// Compute the size of the universe (here: 2px per cell)
const width = boundingClientRect.width >>> 1;
const height = boundingClientRect.height >>> 1;
const size = width * height; // memory required to store either input or output
const totalMemoryRequired = size + size; // total memory required to store input and output

// Compute the size of and instantiate the module's memory
const numberPages = ((totalMemoryRequired + 0xffff) & ~0xffff) >>> 16; // aligned up in 64k units
const wasmMemory = new WebAssembly.Memory({ initial: numberPages });

// Fetch and instantiate the module
WebAssembly.instantiateStreaming(fetch("../out/main.wasm"), {
  env: { memory: wasmMemory },
})
  .then(initGame)
  .catch((err) => {
    throw err;
  });

// Executed when the WASM module is instantiated
function initGame(module) {
  const exports = module.instance.exports;

  // Tell the module about the universe's width and height
  exports.init(width, height);

  // Fill input at [0, s-1] with random live cells
  const memory = new Uint8Array(wasmMemory.buffer);
  for (let y = 0; y < height; ++y)
    for (let x = 0; x < width; ++x)
      memory[y * width + x] = Math.random() > 0.1 ? 0 : 1;

  // Update about 30 times a second
  const desiredFps = 30;
  const frameDuration = 1000 / 30;
  function update() {
    setTimeout(update, frameDuration);
    exports.step();
    // copy output at [size, totalMemoryRequired] to input at [0, size]
    memory.copyWithin(0, size, totalMemoryRequired);
  }

  // Poorly optimised render function
  // Easily bigger bottleneck than the actual module
  function render() {
    requestAnimationFrame(render);

    context.fillStyle = "rgba(238,238,238,0.67)";
    context.fillRect(0, 0, width << 1, height << 1);
    context.fillStyle = "#333";

    for (var y = 0; y < height; ++y)
      for (var x = 0; x < width; ++x)
        if (memory[size + y * width + x])
          context.fillRect(x << 1, y << 1, 2, 2);
  }

  update();
  render();
}
Compiling TypeScript to WASM
We will use the AssemblyScript compiler to compile the project. AssemblyScript comes with the CLI tool ast .
WebAssembly Studio uses Gulp to build the project, so we will stick to that as it is the recommended way to implement the build pipeline.
const gulp = require('gulp');

gulp.task('build', callback => {
  const asc = require('assemblyscript/bin/asc');
  asc.main(
    [
      'main.ts',
      '--baseDir',
      'assembly',
      '--binaryFile',
      '../out/main.wasm',
      '--sourceMap',
      '--importMemory',
      '--optimize',
      '--measure'
    ],
    callback
  );
});

gulp.task('default', ['build']);
Note that we need to include the flag --importMemory as we want to have access to the WebAssembly.Memory object within the JS orchestrator.
Now we have all the pieces to write the actual Conway’s Game of Life.
The actual code
Let’s write some AssemblyScript! AssemblyScript is a subset of TypeScript, with direct mappings to WebAssembly types and a nice standard library mapping to JavaScript APIs. However amazing this tool is, take into account that that AssemblyScript has some limitations.
For this example, we will use the following types and built-ins:
i32: 32-bit integer. Simple, right?u8: Unsigned 8-bit integerusize: If targetting 32-bit WebAssembly (we are), then it is au32.load<Type>(pointer:usize): Loads a value of the specified type from memory. Equivalent to dereferencing a pointer in other languages.store<Type>(pointer:usize): Stores a value of the specified type to memory. Equivalent to dereferencing a pointer in other languages when assigning a value.
In the official Wiki, you can find a complete list of types and a complete list of built-ins.
Now the code:
// The Game of Life, also known simply as Life, is a
// cellular automaton devised by the British
// mathematician John Horton Conway in 1970.
//
// https://en.wikipedia.org/wiki/Conway's_Game_of_Life

let width: i32;
let height: i32;
let size: i32;

/** Initializes width and height. Called once from JS. */
export function init(inputWidth: i32, inputHeight: i32): void {
  width = inputWidth;
  height = inputHeight;
  size = width * height;
}

/** Performs one step. Called about 30 times a second from JS. */
export function step(): void {
  // The universe of the Game of Life is an infinite two-dimensional
  // orthogonal grid of square "cells", each of which is in one
  // of two possible states, alive or dead.

  for (let row = 0; row < height; ++row) {
    // Create the torus ilusion. Top and bottom are connected.
    const rowMinus1 = row == 0 ? height - 1 : row - 1;
    const rowPlus1 = row == height - 1 ? 0 : row + 1;

    for (let column = 0; column < width; ++column) {
      // Create the torus ilusion. Left and right are connected.
      const columnMinus1 = column == 0 ? width - 1 : column - 1;
      const columnPlus1 = column == width - 1 ? 0 : column + 1;

      // Every cell interacts with its eight neighbours,
      // which are the cells that are horizontally,
      // vertically, or diagonally adjacent:
      const aliveNeighbors =
        load<u8>(rowMinus1 * width + columnMinus1) +
        load<u8>(rowMinus1 * width + column) +
        load<u8>(rowMinus1 * width + columnPlus1) +
        load<u8>(row * width + columnMinus1) +
        load<u8>(row * width + columnPlus1) +
        load<u8>(rowPlus1 * width + columnMinus1) +
        load<u8>(rowPlus1 * width + column) +
        load<u8>(rowPlus1 * width + columnPlus1);

      const alive = load<u8>(row * width + column);
      if (alive) {
        switch (aliveNeighbors) {
          // A live cell with fewer than 2 live neighbors dies, as if caused by underpopulation.
          // A live cell with more than 3 live neighbors dies, as if by overpopulation.
          default: {
            store<u8>(size + row * width + column, 0);
            break;
          }
          // A live cell with 2 or 3 live neighbors lives on to the next generation.
          case 2:
          case 3:
        }
      } else {
        switch (aliveNeighbors) {
          // A dead cell with exactly 3 live neighbors becomes a live cell, as if by reproduction.
          case 3: {
            store<u8>(size + row * width + column, 1);
            break;
          }
          default:
        }
      }
    }
  }
}

// Performing a step uses bytes [0, size - 1] as the input
// and writes the output to [size, 2 * size - 1].

// Note that the code above wastes a lot of space by using one byte per cell.
Done!
Build and run
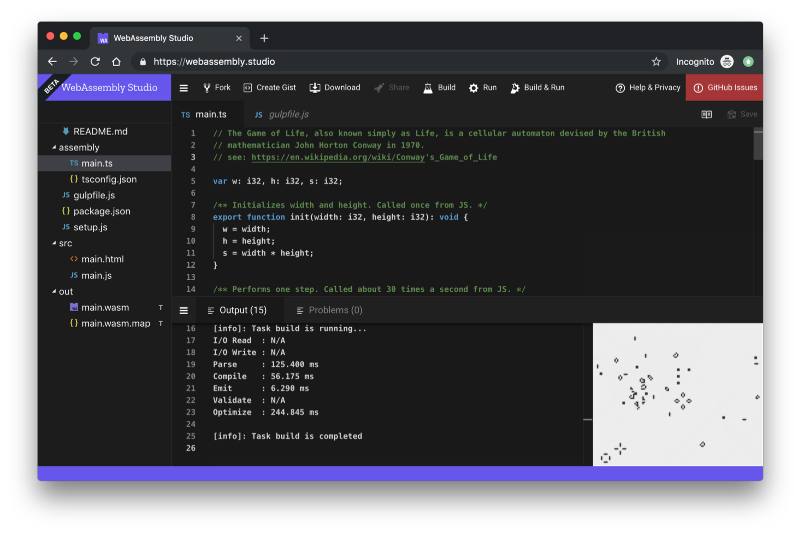
Hopefully, you followed along and properly copied and pasted. Now, if you click the button “Build and Run”, you should see the following:
If it didn’t work, you fork this webassembly.studio, let me know in the comments, check out my finished repository, or… even better… debug the problem yourself, which is the best way to learn!
Running locally
We could download the code written in WebAssembly Studio, and it should be fairly easy to get it running:
cd DOWNLOADED_FOLDER

npm install
npm i -D serve
npm run build

echo "Conway's Game of Life at http://localhost:5000/src/main" \
  && npx serve
That should build the .wasm file and serve it using a static files server. If it doesn’t work, you could clone my repository, which should work (fingers crossed).
Production use
WebAssembly is widely supported (85% globally at the time of writing).
AssemblyScript surprised me positively because it produces a very small module (about ~450 Bytes!) for our Conway’s Game of Life.
For comparison, I tried to build something similar using Golang 1.11, which has native support to compile to WebAssembly and the produced module size was about ~1.5 MB. It could have definitely been optimized opting out of some Golang features, but that bundle size as it is made the module quite unusable.
Anyhow, the tooling around WebAssembly is maturing very quickly, so we can expect very nice tools in the following months/years.
Final note
WebAssembly is not built to suit every use case, and I believe JavaScript is sufficient for most tasks. However, it can be very useful if a piece of Software has to be highly optimized or relies on preexisting code written in a language that could be compiled to WebAssembly (any language with an LLVM front end).
Regardless, WebAssembly and AssemblyScript are totally valid tools in the developer toolbelt and should be considered when the time comes.
Resources
- Fork the working code: https://webassembly.studio/?f=gjavsyu1r8q
- Finished project repository